Sea of Thieves

In my year so far working as a software engineer at Rare, I’ve been spending my time developing features for Sea of Thieves, our recently released multiplayer pirate adventure game.

New to the industry as I am, it’s been an incredible learning experience working with lots of different areas of the codebase, from AI to online services to audio to gameplay. Here’s some of the released features I’ve worked on:

  • Skeletons firing cannons: The projectile physics mathematical code that skeletons use to aim cannons, with adjustable hit/miss/spread parameters.
  • AI variety: Random assignment of AI enemy meshes.
  • Persistent player data: Online services pipeline to securely request player rewards and commendations, and keep player loadout persistent between sessions.
  • Skeleton forts: Assorted sections of the feature including the vault key, music and sound effects triggered by different locations and gameplay events.
  • Aim sensitivity sliders: Allows players to adjust sensitivity for each weapon and input method.
  • Alliances: Part of the Cursed Sails update that allows players to form alliances with enemy crews to share rewards and work together on voyages.

Working in a big codebase is a whole new world, making foolproof, neat code a necessity to balance alongside the pragmatism of getting features out to players. It’s used a lot of transferable teamwork and project management skills from my Mechanical Engineering degree, as well as giving me the chance to collaborate and learn from with departments outside engineering. I’ve also had some great opportunities like participating in official YouTube videos, voicing an NPC (Madam Olivia) and even recording some sound effects on my french horn.

Simulating Springy/Viscous Materials

This is a post from my original portfolio that I used to apply to Rare. I’ve migrated my favourite projects here since I keep my old site untouched to as an example of a successful portfolio to aspiring game programmers. 

Get the source code on Github

After seeing some awesome demonstrations of how materials can be so realistically simulated in games, I decided to have a crack at it myself and apply some of my knowledge from engineering. This is a little demonstration application made in Qt with C++ that models a square of a jelly-like material.

The model is made up of nodes of equal mass that are connected by massless damped springs. Each square of four nodes has an internal pressure that prevents it from collapsing. The nodes are also affected by gravity, are constantly slowed by an “air resistance” factor, and bounce off the walls, losing energy each time.

The calculations for each time step in detail:

  • Force applied by each spring is calculated from the positions of the nodes it is connected to using hooke’s law. The distance between the nodes is compared against the “base” length of the spring, and this extension or compression is multiplied by the spring coefficient. This gives the magnitude of the force, so the vector can be calculated by multiplying by the normalised vector direction of the spring. The resulting force is stored in each end node.
  • Force applied by the damper is calculated for each spring and applied to the end nodes in the same way. Damping resists the velocity of a body, so the force is the damping coefficient multiplied by the velocity, which is approximated from the current and previous extension of the spring.
  • The internal pressure of each element is applied by calculating the average of the positions of the nodes in the element and adding  a force to each outwards from this point in the same way it is with the spring- proportional to the extension or compression compared with the base length of this distance.
  • For each node these forces are divided by its mass and added to the acceleration due to gravity to give the sum acceleration of the node. Since there is a constant timestep differentiation to give the velocity is simplified to adding the acceleration to the last velocity. At this point the resistance factor is multiplied by the velocity and the new position is calculated by adding the velocity onto the last position.
  • After updating the positions, any collisions with the walls are detected and if there are any the velocity for that node is reversed normal to the wall.

After a lot of fine-tuning I managed to simulate a suitably “wibbly-wobbly” material, which can be adjusted with sliders at the bottom to make it more springy or viscous.

It does however have some limitations:

  • There’s nothing to stop nodes crossing over other springs, which gets wacky fast and can cause the whole structure to collapse into a blob. The way that the internal pressure is calculated drives the structure in improbable directions when this happens.
    • I have tried limiting the compression of the springs and implementing a minimum distance from the centre of gravity of each element. I’ve also tried scaling the spring coefficients to counteract the compression with a larger force. These methods simply cause other springs to stretch further to accomodate the node moving between them.
    • Another method I have tried is basic collision detection against the springs and either reversing or removing the velocity. Reversing the velocity causes the internal nodes to start bouncing against each other, which really doesn’t look right. Removing it makes the node get stuck in the spring, and the whole structure can collapse still. Both those scenarios also don’t account for the node moving fast enough to cross the spring entirely in a single timestep.
    • I could try the approach of adding angular springs at each corner that resist angles between springs of less than 90 degrees. I’m currently working on this.
  • Jitter at the bottom of the screen. Since a node hitting the edge of the screen reverses its velocity, the springs and the weight of the structure drive the nodes to vibrate. I’m attempting to handle this by damping vibrations when nodes are at the edge of the screen.
  • The damping coefficient is proportionate to the velocity of the node, but if the coefficient goes above the scaled equivalent of 1, it will make a force that drives it faster in the other direction. This makes the whole structure basically explode. The problem is that this “1” value is proportionate to the spring constant and the mass of the nodes, so I can’t reliably limit the slider at this point. Scaling the slider is a very viable solution, but for the moment the simulation resets to its default coefficients when this happens.

Dr Hans’ Zany Waves – GGJ2017

This is a post from my original portfolio that I used to apply to Rare. I’ve migrated my favourite projects here since I keep my old site untouched to as an example of a successful portfolio to aspiring game programmers. 

Dr Hans’s Zany Waves on Global Game Jam

Includes game download, source code and team members’ details.

I had an absolutely brilliant weekend participating in the Global Game Jam in Guildford, and this is the end result. I’m crazy about game jams because it gives me the opportunity to work with other people’s ideas and come out with something that uses a range of diferent skills. It’s a great opportunity to learn from each other and push yourself a bit out of your comfort zone in terms of the games you’d usually make.

This year’s theme was “waves” and my team started with the idea of dropping pebbles into a pond, and although we diverged pretty far from that original inspiration the idea of an area-of-effect “weapon” stuck. Our idea was about defeating enemies not by hurting them exactly, but sending them back in time through their (scientifically dubious, but hey, creative licence right?) evolutionary stages. The weapon is charged up to send them further back in time and increase its range.

I was in charge of the programming for the game, which was all done using Unity in C#.  It was a pretty big task but I really wanted to do justice to the awesome content that the rest of my team had created (All of their details are on the Global Game Jam entry). I didn’t get all the content in unfortunately, but I was happy I got the tutorial/story level in.

My approach to programming a game in 48 hours was to try and find a balance between hardcoding hell and investing time in infrastructure. The waves of enemies on the second level, for example, are generated by calling a function that increments an “event” count which is tested by a switch case. Each event calls either the functions that take in an array of dialogue lines and calls the next event once they’ve all been shown and read, or calls functions that specify the level and number of enemies to be generated.

I’m planning to keep working on this, not only to add the rest of the dialogue lines, level counts and sound effects my team came up with, but because it was really fun to create. The big thing I take away from the jam though, is that coding for 19 hours straight is a terrible idea and getting some rest is far more efficient!

Maze Generator – Aim to Cheese

This is a post from my original portfolio that I used to apply to Rare. I’ve migrated my favourite projects here since I keep my old site untouched to as an example of a successful portfolio to aspiring game programmers. 

Play “Aim to Cheese” on itch.io!

While checking out other people’s tech demos for inspiration, I came across one featuring a randomly generated maze. It had a big ol’ space in the middle with all the other paths branching off it, all of which lead to dead ends, or if you were lucky, one more branch off some of them, also leading to a dead end. But how does one stop that from happening, and make a nice satisfying maze that isn’t solved by a systematic and very boring approach of returning to one spot and testing all the paths branching off it? How do you make sure you get a good maze every time?

I had this algorithm figured out for a while but when I saw the Procedural Generation Jam was on I thought this would be the perfect thing to develop in code and submit. I ended up making my first ever 3D game with it, mostly to show off the maze and show how challenging (but possible) it is to solve when you’re not looking at the entire thing from the top.

The Algorithm

The algorithm is based on having a “critical path”, which is a specified minimum number of steps you can take to get to the centre of the maze. This will have a number of paths branch off it, none of which are allowed to create a shortcut across any other path. The number of steps from the centre (hereafter SFC for brevity) are stored in each square, and creating a shortcut across a path does not necessarily create a shortcut across the critical path- but continuously updating the SFC for squares not on the current path as long as this doesn’t affect the critical path is a lengthy process.

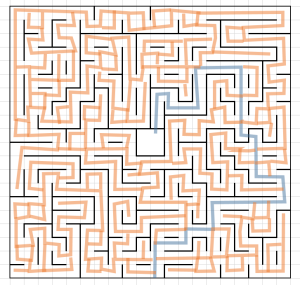
I tested it out manually first using excel, but the first maze was lacking somewhat in walls due to its annoying tendency to create little 2×2 square rooms. (The critical path is in blue)

maze1maze1-wo-paths

After I changed my rules to count paths of equal length to the paths they cut across as prohibited shortcuts, and made it equally likely for a path to continue in the same direction than go left or right (previously a 1/3 chance for each direction), a much more “mazelike” maze was produced.

maze2

I implemented this in Unity, using prefab horizontal and vertical walls with posts to connect them and a 40×40 area size. This led to a couple more improvements. First of all I implemented it still finding the critical path by trial and error. This found some great squiggly paths and I can make it try enough iterations that it has an incredibly low chance of not finding a viable path, but I didn’t want my program to fail/crash every 1 in a million times. Instead I stored the distance away from the centre in each square and stopped the path from moving into a square that was further away than the centre than there were steps left in the path. The only problem then was the path dead-ending itself- easily solved by going back on itself until it could then get back to the centre. I experimented with weighting the path so that it was more likely to go in a more interesting route, and stop it squiggling about at the start of the maze and suddenly going straight to the centre when its “distance from the centre” condition was met.

ver1maze1

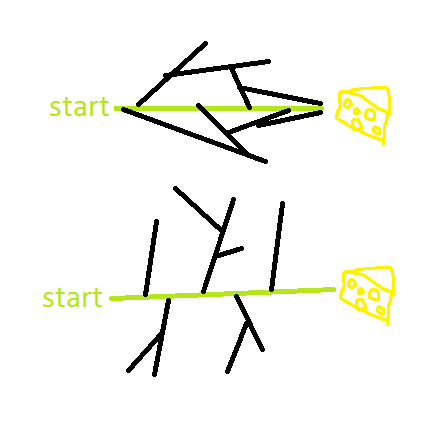
Creating branches off the critical path was then much easier. The only condition is that they are not allowed to create shortcuts off any other path. After creating the game version, I realised that a lot of the mazes had huge sections blocked off with only one point of entry, which was exactly what I was trying to avoid in the first place. I fixed this by setting a maximum branch length, to encourage paths to connect back onto each other- making the diagram of possible routes to the centre more like the first one in this diagram and less like the second.

routes

Here’s the full algorithm:

  • Find a critical path of a specified length (in the examples, 40 steps). Starting on the first step, select a square forward (50% chance), left (25% chance), or right (25% chance). If this square is fewer steps from the centre than there are steps left in the path, step into it. If there are no viable step options, back up one square and mark the previous square as non-viable. Repeat this for the specified number of steps.
  • Randomly select a path-occupied square in the grid. If it has at least one empty square next to it, randomly choose one to start a new path branching off. Otherwise, choose a different square.
  • When making a new path, follow the “stepping” procedure the same as for the critical path until the next step is onto a path occupied square. If the SFC of that square – the SFC of the square this path branched off from < the steps in this path, connect the path onto the square. Otherwise, or if the square is part of the same path, generate a new direction to go in. If all the directions are blocked or the path has reached a specified maximum length, end the path.
  • Once the path is complete, update the SFC of each square by starting from the SFC of the square that the path branches off from, adding one each time. Then repeat this process from the other end, stopping when the next square’s SFC is less than or equal to the current square’s SFC.
  • Repeat steps 2-4 until all the squares have a path across them.

Edit: I also discovered this episode of the excellent game design webseries Extra Credits about procedural generation that really cemented my ideas about how the generator should work and how I can use it going forward.

The Game

With a “lab mouse” scenario in mind I downloaded a cute little mouse asset from the asset store and made the generator into a game. It was my first ever 3D game and the first one with animations- which Unity has of course made quite easy to work with. Programming the camera was quite fun, because I wanted the player to be given some idea of the layout of the maze before they start. For demonstration purposes I added a “cheat” button that shows the critical path, since the feature was already in there for debugging.

It’s something I could add a lot of features to- sound effects, enemies and hints could all make it more engaging.